Scroll Top

Blocking Footwork in Volleyball

GMS-Stripe-Box

Blocking Footwork in volleyball – an intro

In order to be a great individual blocker in volleyball, one must have repeatable, fast, and efficient footwork patterns that accommodate a variety of situations. In order to be a great blocking TEAM, all blockers must have repeatable footwork patterns that allows them to move together along the net.

When we say “footwork,” we are simply talking about the steps that a blocker will use when moving from point A to point B along the net. The footwork patterns will be used by both middle blockers and your wing blockers, depending on the situation.

Teaching your blockers how to move along the net properly will serve as their foundation when it comes to running a successful blocking system.

In this article, we will answer the following questions.

  • What are the most common footwork patterns in volleyball?
  • What are the keys to learning each footwork pattern?
  • Of those patterns, which are used most often?
  • What situations do we use each individual footwork pattern for?
  • What footwork patterns are best for middle blockers?
  • Breaking down footwork pattern priority by age and gender.

What Are The Most Common Footwork Patterns in Volleyball?

At Gold Medal Squared, we consider the following footwork patterns to be an essential part of our blocking system. While having great eye work is critical for our blockers, it doesn’t really matter what we see until we learn to move. Furthermore, footwork patterns in volleyball are typically pretty easy for your athletes to pick up (we find this to be the case for all ages and genders).

Essential Footwork Patterns

  • 3-Step Crossover (X3)
  • 2-Step Shuffle
  • 3-Step Shuggle (Quick 3 or “Q3”)

If you are coaching a youth, club, or high school team, these three moves will be the priority, with the 3-step crossover footwork pattern being your most utilized.

Secondary Footwork Patterns

  • 5-Step Crossover
  • 2-Step Crossover (X2)
  • 1-Step Crossover (X1)

Note – We rarely see good teams using a more traditional 3-step shuffle move when blocking in today’s game. We aren’t referring to the Q3 here, but rather a standard shuffle move toward a pin attacker. This isn’t a footwork pattern that we actively teach, nor do we view it as an efficient, fast move.

3-Step Crossover (X3) Footwork Pattern Overview

The 3-step crossover blocking footwork pattern has been the gold standard for decades. In fact, I can remember teaching this pattern to high school kids way back in the 80s. For years, coaches pushed back saying that the move was too difficult. Today, this is the primary move used by virtually every team at the Olympic games (men and women), the majority of teams in the NCAA (men and women), along with clubs and high schools nationwide. This is the top priority footwork pattern for your athletes.

3-Step Crossover Blocking Footwork (X3)

First, lets have a look at the videos below. Each of the three corresponding images below represents one step in the 3-step crossover footwork pattern.

an image showing blocking footwork for middle blockers

The 1st step is small and fast. Think jab step. Note that you will see very good blockers taking a negative jab step if the speed of the play requires it. While we don’t proactively teach this, we are fine with the move. The first step is designed to be fast, not to cover ground.

an image showing the 2nd step of a 3-step blocking footwork move in volleyball

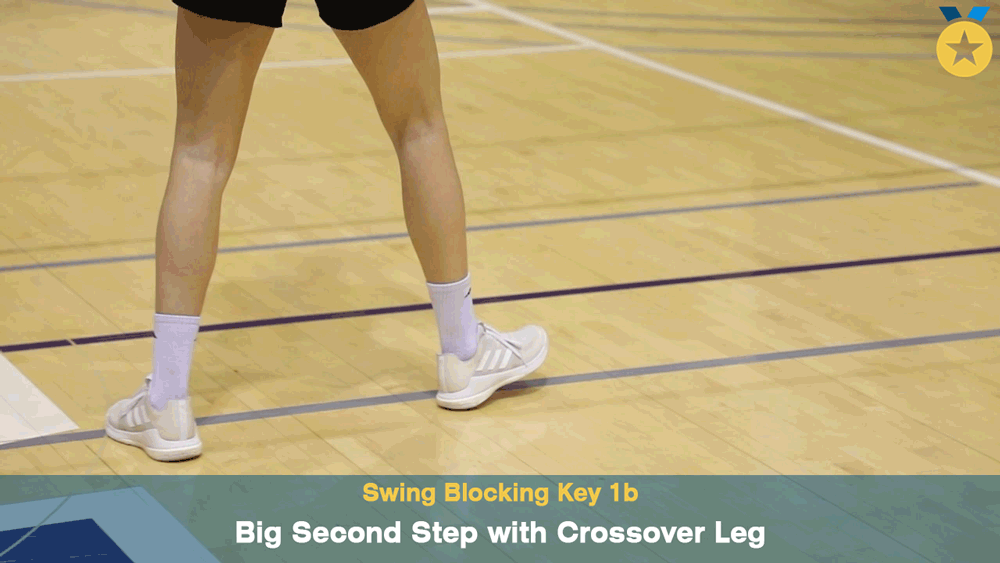
The 2nd step in a 3-step crossover move is where the athlete will cover ground. This is also where an athlete can make adjustments to the set location. An inside set will require a smaller 2nd step, while a set all the way to the pin will require a larger 2nd step.

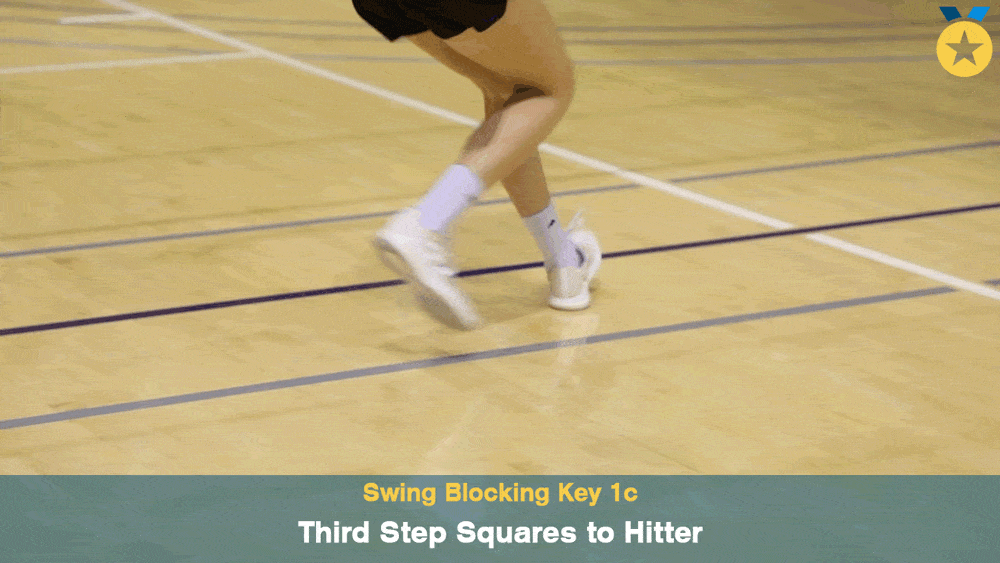
The 3rd and final step is similar to the last step of a spiking approach. It’s the “closing” step that allows the blocker to jump and press over the net. Note, the 3rd step won’t be “square” to the net as momentum will keep the blocker moving towards the hitter during their move. A little bit of drift happens, and that’s ok.

In the video below, you will see international-level

athletes performing the 3-step crossover blocking move very well. Don’t let the level intimidate you. This exact blocking footwork pattern is being used at all levels and genders, which is exactly what we recommend.

Note, we have voiceover with these videos for further explanation.

ADDITIONAL CONSIDERATIONS FOR THE 3-STEP CROSSOVER BLOCKING FOOTWORK

  1. This is a dynamic move. If done properly, athletes will build momentum and some “drift” will happen while in the air. While there’s such a thing as too much drift, we don’t typically coach this unless it’s an issue with a specific athlete. The body is really good at figuring out these small adjustments and we should allow it to do so before proactively coaching this.
  2. We strongly encourage you NOT to talk with your athletes about specific “footwork angles” when they are learning blocking footwork. Again, with enough good reps, the body tends to sort these angles out on its own.

2-STEP SHUFFLE BLOCKING FOOTWORK

  1. The 2-step shuffle footwork is pretty straightforward. It’s exactly how it sounds. If the blocker is moving to his/her right, the first step is with their right foot and it’s a simple shuffle move taking a total of 2-steps. No swing, just a simple shuffle move. If the blocker is moving left, the first step will be with his/her left foot.
  2. This blocking footwork is typically used for small, quick adjustments when the blocker doesn’t have very far to travel. Think gap/go for an A2 blocker or small adjustments by a middle based on the pass or offensive play that the opposing middle is running. 

3-STEP SHUFFLE (QUICK-3 OR “Q3”) BLOCKING FOOTWORK

  1. The quick-3 blocking footwork pattern is useful in situations where the blocker is in a big hurry. It’s also possible to slow down the move, but when time permits, we’d prefer the 3-step crossover outlined above.
  2. When moving right, the first step will be with the right foot. When moving left, the first step will be with the left foot. From there, the blocker takes 3 TOTAL steps while staying square to the net. This is not a swing blocking move.
  3. Fast hands over the net as we are typically playing for touches off the block with this move.

ADDITIONAL CONSIDERATIONS FOR THE QUICK-3 OR “Q3” BLOCKING FOOTWORK

  1. We have some opportunities for optimization with this particular footwork pattern. Make sure that your blockers aren’t “bouncing” along the net (takes time). We want their head/shoulders to be pretty steady, allowing for an efficient move and fast hands over the net.
  2. When teaching this move, oftentimes your blockers will end up taking a 4th step when jumping. For example, if a middle is moving to his/her right, it would be R, L, R, L jump. Make sure that they are jumping on step three and not adding the fourth step. The correct sequence would be R, L, R jump.
  3. We wouldn’t consider this our most dynamic footwork pattern, but it’s still useful in certain situations and worth teaching.
  4. This is another move that often promotes and requires “drift” – don’t mandate that your players “jump straight up” when making these moves.

ADDITIONAL BLOCKING FOOTWORK PATTERNS TO CONSIDER

Below are two more blocking footwork patterns that we see at the higher levels of the game. We occasionally see the X2 being used in college women’s volleyball, but it tends to get more utilization on the men’s side. Same with the X1. This is a fairly common footwork pattern used by middle blockers in the men’s international game.

5-STEP CROSSOVER BLOCKING FOOTWORK

The 5-step blocking footwork pattern is commonly used by the “off-blocker” when triple blocking. It’s designed to cover more ground and gives the athlete a lot of flexibility in terms of adjusting speed and distance. Reference the video examples below.

2-STEP CROSSOVER OR “X2” BLOCKING FOOTWORK – EMERGENCY MOVE

We see the crossover 2 or X2 blocking footwork pattern being used primarily by middle blockers on the men’s side of the game. In this video, you will see the middle blocker from the Italian Men’s National team utilize this footwork pattern after a small dedicate move to his right.

The move is two total steps. The blocker begins with a small left foot step followed by a large second step into his jump.

FREQUENCY OF EACH VOLLEYBALL BLOCKING MOVE IN NCAA MATCHES

It’s important for coaches to know what moves are most appropriate in the many different scenarios their athletes will be in throughout a match and a season. This understanding will help coaches properly train their athletes and teach the most important moves.

The 3-step crossover block move is far and away the most commonly used blocking move by good college, professional, and international blockers.

1-STEP CROSSOVER OR “X1” BLOCKING FOOTWORK – EMERGENCY MOVE

The Italian men’s national team is using this blocking footwork pattern. It’s used by middle blockers who are in a hurry and don’t have time to make a traditional 3-step crossover (X3). We think it’s a pretty good move and one that we’d like to see more athletes using in emergency situations.

In the video below, the middle blocker #14 takes a very small jab step to his right and then crosses over with his left. Often times that small 1st step doesn’t even happen, hence the X1 name. It’s basically a 1-step crossover move that still allows the blocker to be fast and dynamic. 

If the blocker is moving right, he/she will crossover with their left foot. If the blocker is moving left, the crossover happens with their right foot. A third step doesn’t happen, as the blocker jumps once that initial crossover step is planted.

We do feel that this move is more effective for your taller more physical middles who can shoot their hands over the net quickly. While not an absolute rule, it’s just better suited for that type of athlete given how fast it happens.

BLOCKING FOOTWORK SUMMARY

We hope that this gives you a great overview of the most common blocking footwork patterns in volleyball. If you are just getting started, we would recommend the 3-step crossover, the 2-step shuffle, and the quick-3 as your primary patterns. You can have a great blocking system with only these three options.

If you’d like more blocking education, please reference our additional blog posts below. We also have complete blocking courses within our subscription based platform GMS+. If you’d like to take a look, we do offer a free trial which can be found here https://www.goldmedalsquared.com/gms-plus

Swing Blocking – https://www.goldmedalsquared.com/post/swing-blocking-in-volleyball

Mastering The Bunch Read Blocking System – https://www.goldmedalsquared.com/post/blocking-in-volleyball

BLOCKING TECHNIQUES AND STRATEGIES WITH KEEGAN COOK AND CHRIS TAMAS

NCAA Final-Four volleyball coaches Keegan Cook (University of Washington) and Chris Tamas (University of Illinois) break down everything related to blocking in the sport of volleyball, complete with video examples of the many footwork patterns and strategies that should be used by middle blockers and wing blockers.

Learn from these two great blocking coaches as they teach the patterns, discuss the strategies, and give suggestions for coaches that want to be better at coaching this blocking aspect of volleyball.

The following playlist includes Keegan’s and Chris’ breakdowns and thoughts about:

  • The importance of blocking compared to other skills
  • Volleyball blocking footwork patterns
  • Volleyball blocker positioning & posture
  • Volleyball blocker armwork and eyework
  • Volleyball blocking strategies for middle blockers and wing blockers
  • And more

Categories
Follow Us
Most Viewed